Meta Description: Tired of appliance clutter taking over your kitchen? Discover practical kitchen appliance storage solutions that free up counter space, protect your appliances, and make cooking actually enjoyable. Tested solutions for real kitchens.
Reading Time: 14 minutes | Difficulty: Beginner to Intermediate | Last Updated: April 2026
That Moment When You Cannot Find Space to Prep Food Because Every Counter Is Covered
You know the feeling. You are ready to make dinner. You have the ingredients. You have the recipe. But your counters are covered with appliances you have not used in months. The toaster is where you need to chop vegetables. The blender is blocking your cutting board. The Instant Pot is taking up prime real estate even though you use it once a month.
So you move three appliances to make space. You cook. Then you put them back exactly where they were. Tomorrow, the cycle repeats.
This is not just annoying. This is expensive. The average household owns $1,500-3,000 worth of small kitchen appliances. Most get used less than 10 times per year. They take up valuable counter space. They collect grease and dust. And they make your kitchen feel chaotic instead of inviting.
Good appliance storage is not about hiding everything away. It is about having the right appliances accessible at the right time. It is about counters clear enough to actually cook on. It is about appliances that last longer because they are stored properly.
This guide shows you how to make that happen. No expensive renovations required. No giving up appliances you actually love. Just practical, proven solutions that work for real kitchens with real cooking habits and real space constraints.
Why Your Current Appliance Storage Is Making Cooking Harder
Let us talk about what bad appliance storage actually costs. It is more than just clutter.
The Counter Space Tax:
Every appliance on your counter takes up 1-2 square feet of prep space. The average kitchen has 10-15 square feet of counter space. With 5-7 appliances sitting out permanently, you lose 50-70% of your usable prep area. That is like trying to cook in a kitchen half the size it actually is.
The Appliance Lifespan Cost:
Appliances left on counters deteriorate faster. Dust gets into motors. Grease builds up on exteriors. Sunlight fades plastics and metals. The average countertop appliance lasts 3-5 years. Properly stored appliances last 7-10 years. That is hundreds of dollars in premature replacements.
The Cleaning Burden:
Every appliance on your counter is another surface to clean around. Another item to move before wiping down. Another place for crumbs and grease to accumulate. The average household spends 2-3 extra hours per week cleaning around countertop appliances. That is 100-150 hours per year.
The Mental Load:
Visual clutter creates cognitive load. Your brain processes every item in your visual field. A counter covered with appliances feels chaotic even when you are not consciously thinking about it. This increases kitchen stress and decreases cooking enjoyment.
The Goal:
Your appliance storage should accomplish three things. First, daily-use appliances are accessible without bending or reaching. Second, weekly-use appliances are stored but easy to retrieve. Third, your counters are clear enough to actually prep food on.
That is it. Nothing fancy. Just functional, sustainable organization that makes cooking enjoyable instead of frustrating.
The Great Appliance Audit: Know What You Actually Use
Before you buy a single storage solution, you need to know what you are working with. Most homeowners have no idea how many appliances they own or which ones they actually use.
The Weekend Appliance Audit:
Set aside 2-3 hours on a weekend. Empty every cabinet, drawer, and counter space where appliances live. Bring everything out where you can see it all. Yes, even that bread maker from your wedding that you have not plugged in since 2023.
Lay everything out where you can see it all. This moment is eye-opening. Most homeowners discover they own 2-3 of common appliances. Multiple toasters. Two blenders. Three different types of coffee makers.
Sort Into Four Piles:
Daily Use: Appliances you use every day or every other day. Coffee maker. Toaster. Maybe a microwave. These stay accessible.
Weekly Use: Appliances you use 1-4 times per month. Blender. Food processor. Instant Pot. These get stored but remain accessible.
Monthly or Seasonal Use: Appliances you use a few times per year. Stand mixer. Bread maker. Ice cream maker. These get stored in less accessible locations.
Never Use: Appliances you have not used in 12+ months. Be honest. If you have not touched it in a year, you probably never will.
What You Will Discover:
Most households use only 3-5 appliances regularly. The rest collect dust. This is normal. This is also fixable.
Keep what you actually use. Store what you use occasionally. Donate what you never use. This alone frees up 60-80% of your counter space.
The Hard Questions:
“But It Was Expensive”:
Sunk cost is sunk. Keeping an unused $400 stand mixer does not make it worth $400. It just takes up space. Donate it to someone who will use it. That honors the investment better than letting it collect dust.
“But I Might Use It Someday”:
Someday rarely comes. If you have not used it in 12 months, you will not use it in the next 12 months either. Trust the pattern.
“But It Was a Gift”:
The gift served its purpose when you received it. You do not honor the giver by keeping something you do not use. You honor them by using gifts or passing them to someone who will.
Appliance Usage Guidelines:
| Usage Frequency | Storage Location | Examples |
|---|---|---|
| Daily | Countertop | Coffee maker, toaster |
| Weekly | Easy-access cabinet | Blender, food processor |
| Monthly | Standard cabinet | Instant Pot, air fryer |
| Seasonally | Deep storage | Stand mixer, bread maker |
| Never | Donate | Anything unused 12+ months |
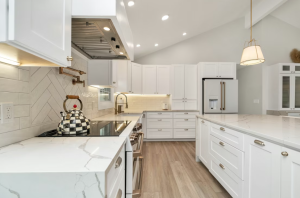
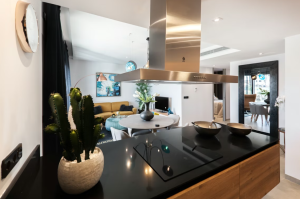
Countertop Strategy: The Art of Strategic Visibility
Not all appliances should be hidden. Some deserve counter real estate. The key is being intentional about which ones.
The Countertop Rule:
Only appliances that meet ALL three criteria stay on counters:
Used Daily or Every Other Day:
If you use it less than 3-4 times per week, it does not deserve counter space.
Adds Value to Your Routine:
Does this appliance make your life meaningfully easier? Or is it just habit?
Looks Good in Your Space:
Does it complement your kitchen aesthetic? Or does it create visual clutter?
If an appliance does not meet all three criteria, it gets stored.
Ideal Countertop Appliances:
Coffee Maker:
For daily coffee drinkers, this deserves counter space. Choose a model that fits your aesthetic. Keep the area around it clean.
Toaster or Toaster Oven:
For daily toast makers, this earns counter space. Keep it clean. Position away from prep areas.
Water Kettle:
For tea drinkers or those who use hot water frequently, this is worth counter space. Keep it descaled and clean.
What Stays Off Counters:
Blenders:
Unless you make smoothies daily, store these. They are bulky and create visual clutter.
Food Processors:
These are weekly or monthly use items for most households. Store in cabinets.
Stand Mixers:
Beautiful but heavy. Store unless you bake multiple times per week.
Instant Pots and Slow Cookers:
These are meal prep appliances, not daily use. Store between uses.
Air Fryers:
Unless you use daily, these are bulky and deserve cabinet storage.
Countertop Organization Tips:
Create Appliance Zones:
Group appliances by function. Coffee station together. Breakfast appliances together. This creates visual order even with multiple appliances.
Leave Prep Space:
Always keep at least 2-3 square feet of clear counter space for food prep. Appliances should not block your ability to actually cook.
Manage Cords:
Bundle excess cord length. Use cord clips to keep cords off counter surfaces. This reduces visual clutter significantly.
Clean Daily:
Wipe down countertop appliances daily. Grease and dust accumulate quickly. Clean appliances look intentional. Dirty appliances look like clutter.
Cabinet Storage Solutions: Where Appliances Should Actually Live
Most appliances deserve cabinet storage. The key is making that storage accessible and protective.
Pull-Out Shelves:
Pull-out shelves transform deep cabinets into accessible appliance storage. No more crawling into cabinets to retrieve heavy mixers.
Best For:
- Heavy appliances (stand mixers, food processors)
- Appliances used weekly
- Deep lower cabinets
Price: $100-400 per cabinet depending on size and quality
Installation Tips:
- Install in lower cabinets (waist height or below)
- Ensure shelf can support appliance weight
- Leave space for cord storage
- Measure appliance height before installing
Appliance Garages:
Appliance garages are cabinet compartments with roll-up or swing-up doors. Appliances stay hidden but accessible. Perfect for frequently used appliances that you do not want on display.
Best For:
- Coffee makers
- Blenders
- Toaster ovens
- Any appliance used 2-4 times per week
Price: $200-800 depending on size and customization
Installation Tips:
- Install near power outlets
- Ensure door clearance when open
- Include interior power strip
- Size to fit your specific appliances
Deep Cabinet Storage:
Standard deep cabinets work well for appliance storage with the right organization.
Best For:
- Monthly use appliances
- Seasonal appliances
- Backup appliances
Price: $0 (existing cabinets) plus $50-150 for organizers
Organization Tips:
- Use shelf risers to double vertical space
- Store appliances with cords wrapped
- Label cabinet doors for easy identification
- Keep heaviest items on bottom shelves
Corner Cabinet Solutions:
Corner cabinets are often wasted space. Lazy Susans and pull-out corner systems make them usable for appliance storage.
Best For:
- Medium-weight appliances
- Appliances used monthly
- Utilizing awkward corner space
Price: $150-600 for corner organizers
Appliance Storage by Cabinet Type:
| Cabinet Type | Best Appliances | Organization Solution |
|---|---|---|
| Lower cabinets | Heavy appliances | Pull-out shelves |
| Upper cabinets | Light appliances | Standard shelves |
| Corner cabinets | Medium appliances | Lazy Susans |
| Pantry | Small appliances | Shelf risers |
| Appliance garage | Frequent-use appliances | Built-in garage |
Create Appliance Stations: Workflow Meets Storage
Appliances are not just random objects. They are grouped by what you make with them. Organizing by station makes cooking more efficient and storage more logical.
The Coffee Station:
Appliances:
Coffee maker. Grinder. Kettle. Maybe a milk frother.
Accessories:
Coffee beans or grounds. Filters. Mugs. Sugar and creamer. Stirrers.
Storage Location:
Near water source. Near power outlet. Away from main prep areas.
Organization:
Keep coffee maker accessible (counter or appliance garage). Store beans in airtight containers. Keep mugs nearby. Store accessories in drawer below or cabinet nearby.
The Baking Station:
Appliances:
Stand mixer. Hand mixer. Food processor. Maybe a bread maker.
Accessories:
Mixing bowls. Measuring cups and spoons. Baking pans. Ingredients (flour, sugar, etc.).
Storage Location:
Lower cabinet near prep area. Ensure cabinet can support weight.
Organization:
Store mixer on pull-out shelf. Keep bowls nested together. Store measuring tools in drawer divider. Keep baking pans stacked or filed vertically.
The Breakfast Station:
Appliances:
Toaster. Toaster oven. Maybe a waffle maker or griddle.
Accessories:
Bread. Butter. Jams. Breakfast plates. Syrup.
Storage Location:
Near counter space for eating. Away from main prep areas if possible.
Organization:
Keep toaster accessible. Store specialty appliances (waffle maker) in nearby cabinet. Keep breakfast accessories in nearby drawer or cabinet.
The Meal Prep Station:
Appliances:
Instant Pot. Slow cooker. Air fryer. Blender.
Accessories:
Cutting boards. Knives. Meal prep containers. Spices.
Storage Location:
Lower cabinet near main prep area. Ensure easy access.
Organization:
Store appliances on pull-out shelves. Keep accessories in nearby drawers. Label cabinet for easy identification.
Why Stations Matter:
When you want to make coffee, everything you need is in one area. No running across the kitchen. No digging through unrelated items. You grab what you need and make your coffee.
This saves 2-3 minutes per task. Multiply that by multiple tasks per day. That is an hour saved per week.
Cord Management: The Invisible Clutter Killer
Appliance cords create invisible clutter. They tangle. They hide behind appliances. They create tripping hazards. Proper cord management transforms appliance storage instantly.
The Cord Management System:
Step 1: Audit Your Cords
Gather every appliance cord. Identify what each one is for. Test that each appliance works. Discard cords for appliances you do not own anymore.
Step 2: Bundle Excess Length
Use velcro cable ties to bundle excess cord length. Do not cut cords. Bundle loosely to avoid damage. Secure bundles with ties.
Step 3: Label Every Cord
Use cord labels or masking tape and marker. Label near the plug end. “Coffee Maker.” “Blender.” “Stand Mixer.” Future you will be grateful.
Step 4: Store Cords With Appliances
Never store cords separately from their appliances. Wrap cord around appliance base or bundle and secure with velcro. Store together in cabinet.
Cord Management Products:
Velcro Cable Ties:
- Best for: Bundling cords
- Price: $10-20 per pack
- Best feature: Reusable, adjustable
Cord Clips:
- Best for: Securing cords to surfaces
- Price: $10-30 per pack
- Best feature: Keeps cords in place
Cord Wrappers:
- Best for: Individual appliance cords
- Price: $5-15 each
- Best feature: Keeps cord neatly wrapped
Power Strip Management:
In Appliance Garages:
Install a power strip inside appliance garages. Plug in multiple appliances. Turn on one switch to power everything. This eliminates cord clutter at the outlet.
In Cabinets:
Mount power strips inside cabinets where appliances store. Run one cord to outlet. Plug multiple appliances into strip. This reduces visible cords significantly.
Cord Safety Tips:
Never:
- Run cords under rugs or carpets
- Use damaged or frayed cords
- Overload power strips
- Leave cords where they can be tripped over
Always:
- Check cords regularly for damage
- Unplug appliances when not in use
- Keep cords away from heat and water
- Replace damaged cords immediately
Small Kitchen Solutions: Maximum Function in Minimal Space
Small kitchens need appliance storage most. But they have the least space to work with. These solutions maximize every inch.
Vertical Storage:
Appliance Lifts:
Install appliance lifts in lower cabinets. Appliance stays in cabinet. Push button to lift to counter height. Use. Push down to store. This gives you counter access without permanent counter space.
Best For: Stand mixers, heavy appliances
Price: $300-800 per lift
Stackable Storage:
Appliance Stacking:
Store appliances vertically in cabinets. Use shelf risers to create multiple levels. Lighter appliances on top. Heavier on bottom. This doubles or triples cabinet capacity.
Best For: Blenders, food processors, small appliances
Price: $20-60 for shelf risers
Multi-Function Appliances:
Replace Multiple With One:
Instead of toaster, toaster oven, and air fryer, get one quality multi-function appliance. This reduces appliance count while maintaining functionality.
Best For: Small kitchens, minimalists
Price: $150-400 for quality multi-function appliance
Hidden Storage:
Appliance Cabinets:
Dedicate one cabinet entirely to appliances. Install pull-out shelves. Store 5-10 appliances in one cabinet. Close door and counters are clear.
Best For: Any kitchen size
Price: $200-600 for cabinet organizers
Rolling Storage:
Appliance Carts:
Use rolling carts for appliance storage. Store appliances on cart. Roll out when needed. Roll away when done. Perfect for kitchens with zero counter space.
Best For: Very small kitchens, renters
Price: $100-300 for quality cart
Small Kitchen Appliance Guidelines:
| Kitchen Size | Countertop Appliances | Cabinet Appliances | Storage Solution |
|---|---|---|---|
| Under 50 sq ft | 1-2 maximum | 4-6 | Rolling cart + cabinets |
| 50-100 sq ft | 2-3 maximum | 6-8 | Appliance garage + cabinets |
| 100-150 sq ft | 3-4 maximum | 8-10 | Mix of solutions |
| 150+ sq ft | 4-5 maximum | 10+ | Full station system |
Maintenance: The 5-Minute Habit That Keeps Appliances Ready
Appliance storage is not a one-time project. It is an ongoing practice. But it does not need to be time-consuming. Five minutes per week keeps your system working.
The 5-Minute Weekly Reset:
After your weekly kitchen cleaning, spend 5 minutes on appliances.
Tasks:
- Wipe down countertop appliances
- Check stored appliances for dust
- Ensure cords are properly wrapped
- Return any appliances left out
This prevents grease buildup and keeps appliances ready to use.
The Monthly Deep Clean:
Once per month, spend 20-30 minutes on deeper appliance maintenance.
Tasks:
- Unplug and move countertop appliances
- Clean underneath and behind appliances
- Check cords for damage
- Clean appliance exteriors thoroughly
- Assess if any appliances should be relocated
This catches small problems before they become big problems.
The Quarterly Assessment:
Four times per year, spend 1 hour assessing your appliance system.
Tasks:
- Review which appliances you actually used
- Note any appliances not used in 3+ months
- Assess if storage is still working
- Donate any appliances you have not used
- Adjust system as needed
This keeps your system evolving with your actual cooking habits.
Appliance Cleaning Schedule:
| Appliance | Cleaning Frequency | Time Required |
|---|---|---|
| Coffee maker | Weekly exterior, monthly descale | 10 minutes |
| Toaster | Weekly crumb tray, monthly deep clean | 5 minutes |
| Blender | After each use, monthly deep clean | 10 minutes |
| Stand mixer | After each use, quarterly deep clean | 15 minutes |
| Food processor | After each use, monthly deep clean | 10 minutes |
| Instant Pot | After each use, monthly seal check | 10 minutes |
Getting Family On Board:
If you share your kitchen, family members need to understand the system. Otherwise, they will pull out appliances and not return them properly.
Show Them Where Everything Lives:
Walk through the system. Explain where each appliance lives. Make it easy for them to succeed.
Set Clear Expectations:
Appliances get returned after each use. Cords get wrapped properly. Simple rules, consistently enforced.
Make It Worth Their While:
When appliances are organized, cooking is faster. Cleanup is easier. Everyone benefits. Point this out.
The Reality Check:
Perfection is not the goal. Function is the goal. Some days you will not have time to return every appliance perfectly. That is okay. The system should be forgiving enough to recover quickly.
Aim for 80% maintenance. If appliances are returned to correct locations 80% of the time, the system works. Do not stress about the other 20%.
Your Action Plan: Start This Weekend
Do not wait for the perfect kitchen renovation. Start with what you have and improve over time.
This Weekend (3-4 hours):
- Complete the appliance audit
- Sort into daily, weekly, monthly, donate piles
- Clear counters of non-daily appliances
- Set up one cabinet for appliance storage
- Label your first storage area
Next Weekend (2-3 hours):
- Install pull-out shelves or organizers
- Set up appliance stations
- Bundle and label all cords
- Create simple inventory list
Ongoing (5 minutes weekly):
- Weekly reset habit
- Return appliances after each use
- Monthly deep clean
- Quarterly assessment
Budget Breakdown:
Minimalist ($100-300):
- Basic cabinet organizers
- Simple cord management
- DIY appliance stations
- Covers 80% of needs
Moderate ($300-800):
- Quality pull-out shelves
- Appliance garage (one)
- Complete cord management
- Covers 95% of needs
Comprehensive ($800-2500):
- Multiple pull-out systems
- Custom appliance garages
- Full station setup
- Professional cord management
- Covers 100% of needs
The Bottom Line: Your Kitchen Should Support Your Cooking, Not Sabotage It
Your appliances deserve better than counter clutter and dust collection. You deserve counters clear enough to actually prep food on. Your cooking deserves to be enjoyable instead of frustrating.
Start small. This weekend. Audit your appliances. Clear your counters of non-daily items. Set up one cabinet for storage. Build from there.
Two months from now, you will not remember the time you spent organizing. But you will remember every single time you had space to prep food. Every meal that started with a clean counter. Every morning that began with a calm kitchen instead of chaos.
That is worth a weekend of work.
Related Resources
- Complete Kitchen Organization Guide
- Small Kitchen Storage Solutions
- Kitchen Cabinet Organization Tips
- Appliance Maintenance and Care Guide
- Kitchen Counter Decluttering Guide